Installing your own solar power system is an exciting step toward energy independence, but you’ll need to navigate the permitting process before you can start generating clean electricity.
While paperwork might not be the most thrilling part of your DIY solar journey, understanding and properly handling permits and regulations is crucial for a legal, safe, and successful installation.
Key Takeaways:
- Most DIY solar installations require multiple permits, including building, electrical, and interconnection permits
- Permit requirements vary significantly by location, so research your local Authority Having Jurisdiction (AHJ)
- Verify that DIY solar installations are allowed in your area before beginning
- The permitting process typically takes 30-45 days, though some locations offer faster approvals
- Proper documentation, including system designs and equipment specifications, is essential for approval
- Budget $200-500 for permit fees, depending on your location and system size
- Non-permitted installations may void your home insurance coverage in case of fire or damage
Understanding Solar Permits
Solar permits are official documents issued by local authorities that give you permission to install a solar power system on your property. These permits ensure your installation meets safety standards, building codes, and local regulations. Skipping this step could result in fines, having to remove your system or complications with insurance and home sales.
Types of Solar Permits Required
When installing a solar power system, you’ll typically need several different permits. The exact requirements vary by location, but most DIY solar installations require:
 ECO-WORTHY 10.7KWH 2400W 48V Solar Power System...
Building Permit
A building permit ensures your solar installation meets local building codes and that your roof or ground mount can safely support the additional weight of the solar array. This permit focuses on:
- The structural integrity of your installation
- Compliance with zoning regulations
- Fire safety considerations
- Setback requirements from property lines
Electrical Permit
The electrical permit verifies that all electrical work associated with your solar installation complies with the National Electrical Code (NEC). This ensures your system will operate safely and won’t create hazards. The electrical permit covers:
- Wiring methods and materials
- Overcurrent protection
- Grounding requirements
- Disconnect locations
- Labeling and signage
Interconnection Agreement
If you’re connecting your system to the utility grid (grid-tied system), you’ll need an interconnection agreement from your electric company. This permit:
- Ensures your system can safely connect to the grid
- Establishes how excess electricity will be handled (net metering)
- Specifies equipment requirements for grid connection
- May include capacity limits based on your service size
Additional Permits
Depending on your location and installation type, you might also need:
- Zoning permit from the Zoning Board of Adjustment
- Homeowners Association (HOA) approval, if applicable
- Dedicated solar photovoltaic (PV) permit
- Land use review for ground-mounted systems
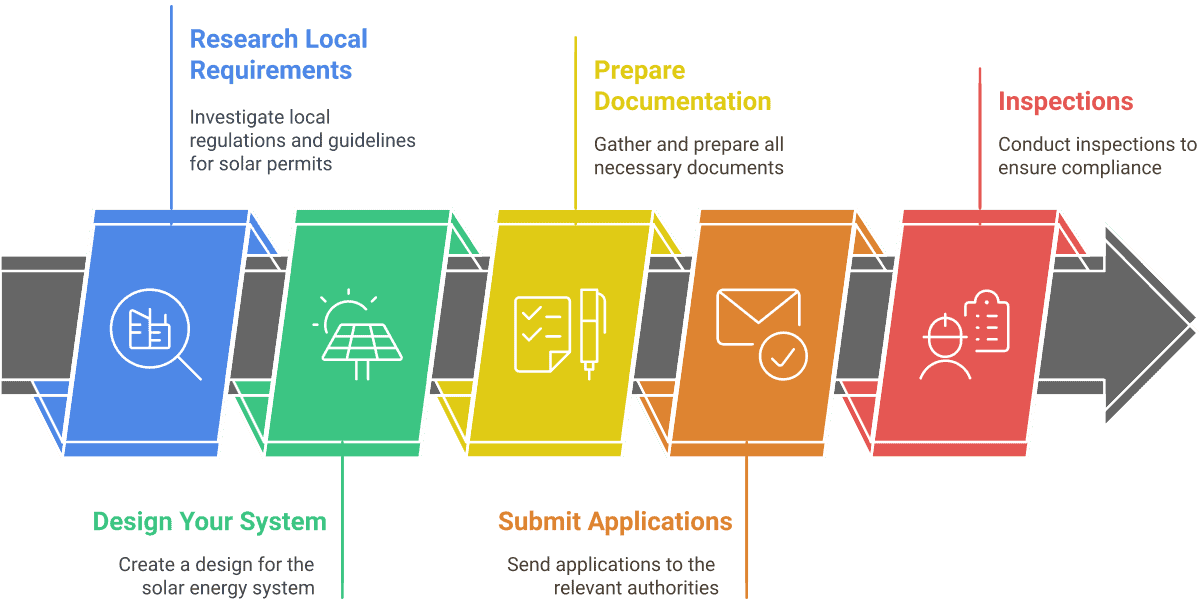
The Solar Permitting Process
The solar permitting process can be broken down into several manageable steps:
Step 1: Research Local Requirements
Start by identifying your Authority Having Jurisdiction (AHJ), which is typically your local building department. You can find this information through the AHJ Registry or by contacting your local city or county government.
Important questions to ask:
- Does your AHJ allow DIY solar installations?
- What specific permits are required for your project?
- What codes and standards must your installation meet?
- Are there any local restrictions on solar installations?
- Do you need engineering stamps or professional certifications?
Also consider Solar Tax Credits and Incentives for Homeowners
Step 2: Design Your System
Before applying for permits, finalize your solar system design. This includes:
- Number and placement of solar panels
- Inverter type and location
- Mounting system specifications
- Electrical connection details
- Battery storage (if applicable)
Many AHJs require detailed site plans and electrical diagrams as part of your permit application. These documents should clearly show:
- Property boundaries and building locations
- Solar panel array layout and dimensions
- Mounting details and attachment points
- Electrical wiring diagrams
- Equipment specifications
Step 3: Prepare Documentation
Gather all necessary documentation for your permit applications. Typically, you’ll need:
| Document Type | Description |
|---|---|
| Site Plan | Shows property layout, panel placement, and setbacks |
| Electrical Diagrams | Single-line diagrams showing system components and connections |
| Structural Calculations | Demonstrates roof can support the added weight |
| Equipment Specifications | Datasheets for panels, inverters, and mounting hardware |
| Application Forms | Completed permit application forms for your jurisdiction |
For DIY installations, be sure to list yourself as the homeowner/installer rather than a contractor. Some jurisdictions may require additional documentation for DIY installations to ensure you understand the safety requirements.
Step 4: Submit Applications
Once your documentation is complete, submit your applications to the appropriate authorities:
- Building and electrical permits go to your local building department
- Interconnection agreements go to your utility company
Most jurisdictions charge permit fees, which typically range from $200-500 depending on your location and system size. Some areas offer reduced fees for solar installations to encourage renewable energy adoption.
Related: The Real Cost of DIY Solar: Budget Breakdown
Step 5: Inspections
After your permits are approved and installation is complete, you’ll need inspections to verify your system meets all requirements:
- Building inspection checks structural elements and mounting
- Electrical inspection verifies wiring, grounding, and safety features
- Utility inspection confirms proper grid connection (for grid-tied systems)
Schedule these inspections in advance and be prepared to make corrections if the inspector identifies any issues.
Insurance Implications
A critical consideration often overlooked is how non-permitted solar installations can affect your home insurance:
- Many insurance companies will not cover damages caused by or related to non-permitted solar installations
- In case of fire or other damage, your claim could be denied if your solar system wasn’t properly permitted
- Some insurers may even cancel your policy if they discover unpermitted electrical work
- Always notify your insurance company about your solar installation plans
Common Challenges and Solutions
DIY solar installers often face several challenges during the permitting process:
Verification of DIY Approval: Some jurisdictions don’t allow DIY solar installations or require a licensed electrician for certain aspects. Solution: Confirm DIY allowances early and budget for professional help if needed.
Changing Requirements: Solar codes and requirements evolve regularly. Solution: Double-check requirements just before applying, as they may have changed since your initial research.
Documentation Complexity: Permit applications can be extensive, often 10-15 pages. Solution: Consider using third-party services to prepare your documentation.
For a comprehensive guide on planning, installing, and maintaining your DIY solar power system, check out our detailed article: The Complete DIY Solar Power System Guide: From Planning to Power Generation.
Conclusion
The permitting process is a crucial foundation for any DIY solar installation, ensuring your system meets safety standards while protecting your investment.
Understanding the different permit types—building, electrical, and interconnection—allows you to navigate local requirements with confidence and avoid potential complications with insurance coverage or home sales.
Taking time to research your Authority Having Jurisdiction, preparing detailed documentation, and budget for permit fees ($200-500) pays significant dividends. This diligence prevents fines and system removal and verifies your installation’s structural integrity and electrical safety.
Most importantly, proper permitting establishes your system’s legitimacy for grid connections and future property transactions.
With permits in hand and inspections complete, you’ll enjoy the true rewards of solar ownership: reduced energy bills, increased property value, and the satisfaction of generating clean electricity.
Your careful attention to regulations now transforms what might seem like bureaucratic paperwork into the gateway to decades of sustainable energy independence.
FAQ
What are the most common challenges in DIY solar permitting, and how can I overcome them?
DIY solar projects often run into issues like inconsistent local rules, long approval timelines, and complex paperwork. To overcome these, start by thoroughly researching your local Authority Having Jurisdiction (AHJ) and their requirements. Double-check all forms and documentation before submitting, and consider using third-party services or design software to ensure your plans meet code.
If you get stuck, reach out to your local building department for clarification or seek help from a solar professional familiar with your area’s process.
How does the SolarAPP+ platform change the permitting process?
SolarAPP+ is an automated, web-based platform that streamlines and speeds up the permitting process for residential rooftop solar in participating jurisdictions. It instantly reviews plans for code compliance and issues permits, reducing delays and paperwork.
However, not all areas use SolarAPP+, so check if your city or county participates before relying on this option.
What’s different about permitting if I want to add battery storage?
Adding battery storage to your solar system usually means you’ll need extra documentation and may face additional scrutiny. Many jurisdictions require you to submit detailed electrical diagrams and safety plans for both the solar array and the batteries. Some areas have adopted simplified guidelines for PV and energy storage, but requirements still vary widely-so always confirm with your AHJ before starting your design.
Why do solar permit requirements vary so much from place to place?
Permit requirements differ because each city, county, or utility can set its own rules based on local building codes, zoning laws, and safety standards. This lack of standardization can make the process confusing, especially if you’re comparing advice from different sources online. Always rely on your local AHJ’s published requirements, and don’t assume what worked in one location will apply elsewhere.
How can I avoid delays during the inspection phase?
Delays often happen when inspection requirements aren’t clearly understood or when documentation is incomplete. Schedule inspections as early as possible and ask your inspector what they’ll be looking for. Make sure your system is installed exactly as approved in your plans, and keep all documentation handy for quick reference. If you fail an inspection, address the issues promptly and reschedule as soon as possible.
Are there ways to simplify or speed up the permitting process for DIY solar?
Yes-some local governments have adopted simplified permitting guidelines or participate in fast-track programs for standard residential systems. Using pre-approved designs, submitting complete documentation, and working with professionals who know your local process can also speed things up. Automated platforms like SolarAPP+ (where available) can make the process nearly instant for qualifying projects.
What should I do if my local utility’s interconnection rules seem confusing or slow?
Utility interconnection is a common bottleneck. Start by contacting your utility early in your project to get their specific requirements. Submit all requested forms and documentation promptly, and follow up regularly to check on your application status. If you encounter delays, politely escalate your request to a supervisor or seek help from a local solar advocacy group.
ECO-WORTHY 10.7KWH 2400W 48V Solar Power System...
Leave a Reply